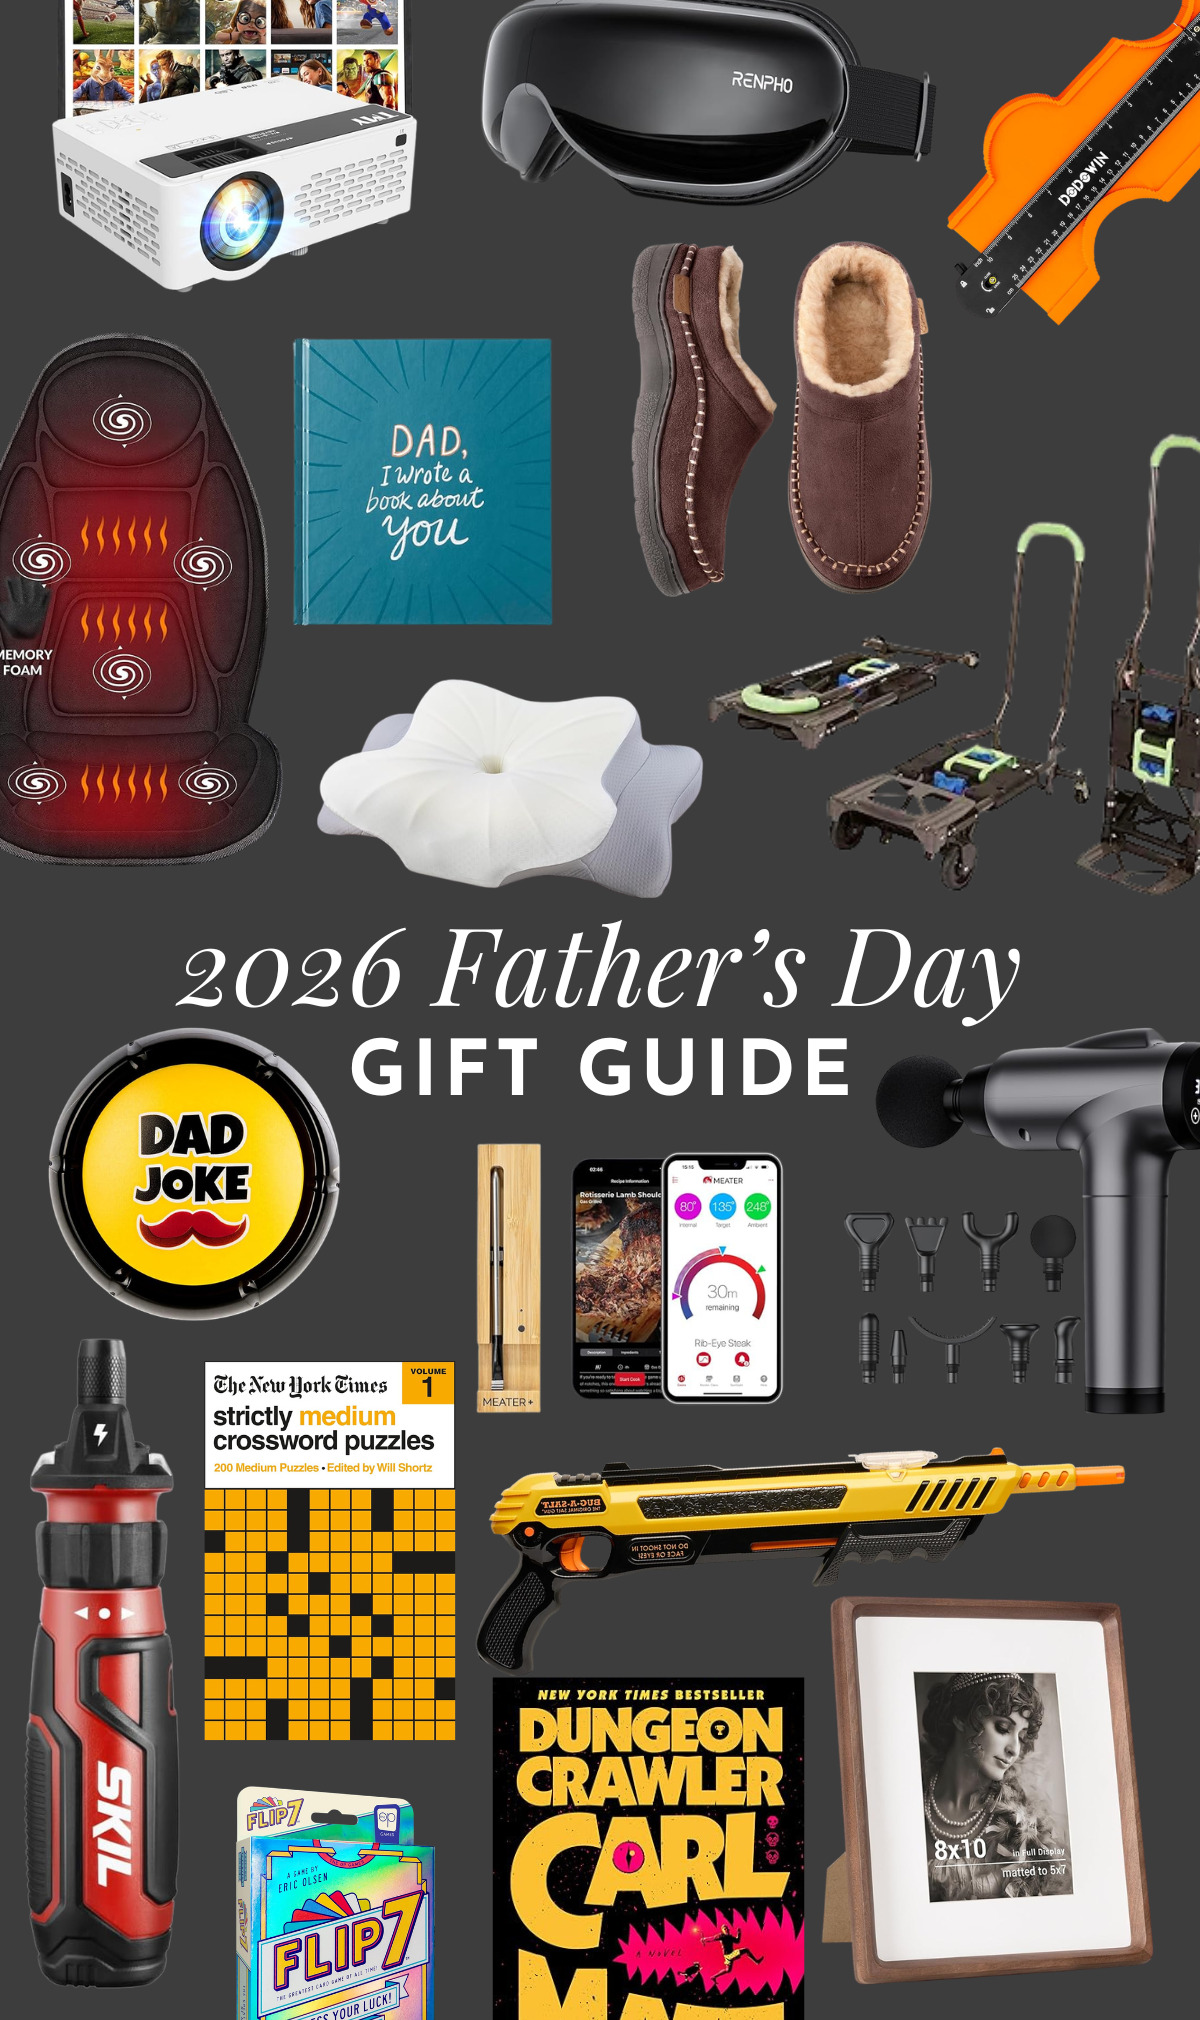
06 May

Tea Towel Art

Posted by Amanda under Art, Home, Kitchen

Have you guys seen my kitchen lately? It’s not cute.

I know I complain about this a lot, but I hate our kitchen. I love the bones of it, and I love the potential it has, but it is oh so ugly. Weird, shiny cabinets, faux-wood laminate countertops, vinyl flooring that never looks clean, and the weirdest texture that has ever been put on walls.

So, over the last year and a half that we’ve lived here, I’ve been doing what I can to make the kitchen slightly more tolerable until we can give it a complete overhaul. I’ve had some success, taking it from here…

…to here.

All minor changes, but they add up and make the room a little less awful.

Well, today I’m adding one more little update to the list.

I’ve been wanting to hang some tea towels in our kitchen for a while now, but I hadn’t found any I really liked. But then, I stumbled on this super cute sangria towel at Anthropologie, and I knew I had to have it.

 LOVE.

We also grabbed this measurement towel from Crate & Barrel, which I’ve seen all over the place. I love how bold and graphic it is, and I’m a huge fan of the size.

I’m not gonna lie – I don’t think they look all that great next to the oh-so-terrible wall color in there, but Corey and I are hoping to take care of the texture and wall color in there over the summer, so hopefully that’ll be fixed soon. And it feels good to finally have some art hanging in our kitchen!

I’m currently on the hunt for the perfect fabric to recover those chairs (I actually like the orange, but it’s falling apart so they need to be redone), so within the next few weeks this little corner of the kitchen will be looking even better. And, of course, once our new windows are installed we’ll be figuring out a good window treatment solution for this area – I’m determined to get rid of ALL the ugly white blinds in our house if it’s the last thing I do!

Anyone else adding some art to the kitchen lately? Am I the only one mildly obsessed with tracking down cute tea towels?

Related posts:

Pin It!

No Comments »

29 Apr

Impossible Things

Posted by Amanda under Art, Handmade, Home, Reading Room

The story behind this project actually started back in week four of CWTS. Corey and I were working on our oh-so-beloved reading room, and we wanted some DIY artwork to hang on the wall behind the chair. You know, the space that’s actually empty in our final photos?

Well, we had a grand plan and even almost finished it during the competition, but decided to nix it at the last second because we already had so much going on in the bookcases and we didn’t want the end result to be too busy. But we were super excited about the idea, so we decided to go ahead and finish it up once the contest was over. And I’m oh so glad we did.

When we were brainstorming ideas for art in the reading room, we knew we wanted something book-related. And, we also knew that if it was going to be related to a specific book, it had to be Alice in Wonderland. It’s my favorite book of all time (I have four copies!) and is probably the most quotable book in the history of ever.

We found a large frame in the As-Is section of Ikea and figured it would be perfect for the project, so we snatched it up.

I decided to sacrifice one of my copies of Alice for this project – we were going to buy a new copy, but I figured three copies of the book is just as good as four so I tearfully let one go.

Just kidding, I didn’t cry.

But I wanted to.

But, if I’m going to be honest here, I have to admit that I’ve already replaced this copy with a new on from Anthropologie. So I’m back up to four and all is right with the world. It’s an addiction.

For the background of the project, I took a razor blade to the book to carefully cut out pages that I thought looked interesting – I tried to go for a good balance of pages with illustrations, chapter intros, and full-text pages. Then I just used some spray adhesive to create a collage of book pages on the back of the frame.

Once that was done, we were about 90% finished with the project (seriously, this one’s a no-brainer). I asked my awesome and oh-so-helpful sister to help me out cutting out the quote we chose with her Cricut. I have one, but I’m still a little scared of it and it takes me about three hours to cut anything outside of the basics in the cartridge, so I figured it was much more efficient to be a baby and ask for her help.

Luckily, she’s nothing if not amazing, so she put something together for me (in like, 5 minutes because she’s a Cricut rock star) and cut it out on plain black scrapbook paper.

And then all I had to do was pull out my trusty glue stick and toss it on!

I told you it was easy.

I got extra lazy with this project and rather than taking the time to measure everything out and make sure it was perfectly spaced, I kind of just eyeballed it. I used an open folder to make sure my line was at least semi-straight, and I slapped the letters on.

I figure if anyone notices that it’s not perfect, I can remind them that it’s a quote from the book that practically invented whimsy, so maybe I did it on purpose!

But it looks pretty dang straight to me.

I’m so obsessed with how this turned out, and I’m head over heels in love with the quote. I love that we were able to pull something from my favorite book in the world, and I love how nicely it fits into the reading room.

Basically, it’s perfect.

What’s your favorite book in the world? Anyone else tossing together some book-related art lately? Or buying four copies of the same book?

…yeah, it’s probably just me on that one.


Related posts:

Pin It!

14 Comments »

24 Apr

The First Big Update

Posted by Amanda under Home, Planning, Updates

Corey and I have lived in this house for a little over a year and a half now, and we’ve made a ton of little updates along the way. We’re constantly tweaking and switching up things in our house, but up until this point we haven’t really done anything major.

Well…it’s time to fix that. I’ve teased several times over the last few weeks that Corey and I are in the process of getting new windows for our house, and we’re so incredibly excited about it. Our house has a ton of very large windows, and every last one of them is aluminum, single pane, not tempered (and therefore not at all up to code) and failing.

People always think I’m exaggerating when I talk about how bad our windows are, but let me put it this way: when you’re sitting on the couch on a cold night, you can feel the breeze from outside on the back of your neck. 

Seriously.

They’re THAT bad.

So, yeah. We’ve been wanting to fix ‘em for a while now but windows are expensive, y’all. Like, jaw-dropping, gut-wrenching expensive.

But, as the weather has started to warm up and we began to think of facing another Texas summer in what is basically a greenhouse (the entire back wall of our house is pretty much floor to ceiling windows, and the afternoon sun hits them perfectly), we knew we were going to have to suck it up and get it done.

First off, I’ll clarify that we aren’t actually updating the windows for the entire house yet. We decided to save some money and only do half of them now, and we’ll go back and do the rest later. We waffled back and forth on if we would split it up, but in the end we realized that if we only do half now we can go ahead and tackle the garage renovation now rather than waiting (eek!!), which made the decision pretty easy. So, throughout the post I’ll sprinkle in some photos of the windows we are replacing, so you can get an idea of what our plans are.

This was our first go-round with hiring someone to do something like this for our house – as you’ve probably noticed, we like to do most things ourselves. But this is a big job, and one that we totally don’t feel comfortable trying to tackle without professional help. So, we called in the pros. The windows aren’t installed yet (though we got confirmation that they were ordered at the end of last week, so they should be here in about two weeks!), but I thought today would be a good opportunity to chat about what we’re having done, and go through the process of hiring someone to do work on your house. It’s hugely intimidating if you’ve never done it before, and we learned a lot from our experience!

When it was time to call someone, we were pretty overwhelmed with options – do we go with a big box store like Lowe’s or Home Depot, or do we call in a smaller local company? Do we have a ton of people out to give us quotes or do we just say screw it and book the first people we meet? How do we know which company to use?

I started off by doing some online research. We have had a couple of quotes in the past (one from Lowe’s when we first moved in, and one from a local company about 6 months ago), so we had a general idea of what to expect in terms of cost. We knew we didn’t want to use the big box store, partially because their windows aren’t that awesome, but mostly because we like to go local whenever we can. We liked the company we had out near the end of last year, but we wanted some more quotes before making a final decision.

So, I turned to Yelp.

I’m a big fan of doing research before using a new company, and the best kind of research is looking up reviews. People are usually pretty brutally honest about their experiences with companies, so I wanted to know who was the best of the best. For example, we found out about a company that was going door to door in our neighborhood right around the time we were looking into getting some quotes – we figured we would have them out, but after checking out their Yelp page for less than five minutes I knew they weren’t the company for us. The reviews were awful, their customer service was pathetic, and their windows weren’t even that great.

My research helped me narrow down the options vastly – I ended up with three companies that had solid reviews and that I thought might be a good fit for us. We set up appointments with all three, and the process was officially in motion.

There are a lot of things that I learned in the process of having all of these people come out for quotes, but here are the top 5 things I think you should keep in mind when hiring out a project (I’m obviously talking specifically about windows here, but I think this applies to anything!):

1. Know what you want. This one sounds like a no-brainer, but when the first company came out Corey and I had put little to no thought into what types of windows we wanted throughout the house. We have some huge openings, and that means there are about a million different configurations we could use. We felt like we were in over our heads and really had no clue what we wanted for these windows, and I wish we would have been more informed from the beginning.

2. Be open minded. Yeah, I know – I just said you should know what you want going into it. BUT, that doesn’t mean that you should be completely set on something and refuse to take suggestions. We took every suggestion from every company very seriously, and got a lot of great advice and ideas on what to do for our windows. It was also a really great way to get a feeling for if the company was a good match for us – if they kept pushing something we weren’t all that interested in, we knew they probably wouldn’t be awesome to work with.

3. Know who is at your house. Two of the companies who we got a quote from were small enough that the owner of the company was the one to give us our quote. The third company was the only one who had an actual salesman out…and it showed. We connected with the owners so much better and got a definite “ick” feeling from the salesman. Knowing that the two companies were small enough and that the owner was dedicated enough that we got the head honcho himself was a great sign to us that they’d be the types of company we’d want to work with. It also helped us give the third guy a little bit of slack for being so slimy, because it’s hard for a salesman to compete with the owner of a company.

4. Ask about timelines. Going into this, we kind of just assumed that all companies would take around the same amount of time to complete the project. But in reality, we got wildly different quotes on how long it would probably take, ranging anywhere from two to eight weeks! Knowing how quick the turnaround would be made a huge impact on our decision.

5. Ask a ton of questions. This is another no-brainer tip, but I can’t emphasize enough how important it is to not be afraid to ask as many questions as you can possibly think of. At times, we felt like we were being a little annoying by asking so many questions and making sure to clarify their answers over and over, but in the end you are essentially interviewing these people – and the salary you are planning on paying them is very high. You want to make sure you’re going to be happy with their work and you know exactly what you’re getting yourself into. So, grill away!

Once we had finished up and received quotes from all three companies, Corey and I sat down and weighed out the pros and cons of each one.

Company 1 was probably our favorite. We really liked the owner and how straightforward and honest he was. The set-up that he suggested for our windows was our favorite of all the companies, the turnaround time was quick, and the windows were the most energy efficient of all the ones we’d seen. The quote, however, was significantly higher than the other companies, and the owner pretty much flat out told us there was no way he could get as low as the other two companies had.

Company 2 had almost the exact same windows as Company 1, only slightly less energy efficient. The owner was a great guy and was definitely the most efficient when giving us our quote (he was in and out of our house in less than an hour!). The turnaround was the same as Company 1, and the window set-up we had planned was significantly more unique than any of the other suggestions we’d received, though we were a little nervous about it. The quote was the lowest of the three.

Company 3 was the only company who made their own windows. Their factory is only about an hour from where we live, which was pretty big for us. We loved how everything was locally-sourced and how we could have gone out to see the windows being made if we wanted to. We were not fans of the salesman who came out – he was friendly enough, but very pushy. He also bragged about things their company did, leading us to believe they were the only company who could do it, only to later find out it was a very common thing to do (such as doing window sashes that are lower than usual to improve your view and make the part that opens smaller). We really wanted to like their windows, but he was a major turn-off for us. Their quote was only slightly higher than Company 2, and their turnaround was significantly longer (which was understandable since they make their own windows).

In the end, it was a pretty easy decision for us to eliminate Company 3 – we’re VERY big on first impressions, and the salesman just left us with a bad feeling. We really wanted to go with Company 1, but their quote was way above what we had planned on spending and, since Company 2 was so incredibly similar (but with a much better price tag), we decided to go with them. I honestly think we would have been happy with any of the companies that we had out, but when you’re dealing with three really great companies you have to be picky sometimes.

And that, my friends, is almost 2,000 words on how we chose our window company. I know it’s not the most exciting post in the world, but I did quite a few searches for something like this when we were first getting started and I found nothing, so I figured I’d provide this for anyone who may be looking.

It is so scary to trust something as huge as this with people you’ve never met, but I have high hopes that our new windows are going to be amazing. I’m just excited to be able to turn on my oven in July without feeling like I’m going to melt.

What are your tips for hiring out a big home improvement project?

Related posts:

Pin It!

4 Comments »

23 Apr

We Have an Attic!

Posted by Amanda under Home, Off-Topic Tuesdays

There’s nothing like discovering an entire section of your house that you’ve never seen before.

This is ridiculous for me to have to admit, but up until about two weeks ago I had never actually seen the inside of our attic. We’ve only lived here for, I don’t know, A YEAR AND A HALF.

The thing is, when we first moved in the inspector told us that he couldn’t even get into the attic because it was so full of insulation, so he didn’t really fully inspect it. He said it looked sound, it was very well-insulated, and pretty much unusable.

And we believed him.

But, as we’re starting to plan for the Great Garage Overhaul of 2013 (that’s right – it has an official title now!) we’ve been trying to get creative with how to store some of our extra stuff. So one day we decided to check out the attic and see if we could make it work.

Turns out, it was full of insulation but it also had boards all along the floor (meaning we could walk on it), and had a surprising amount of space. All we had to do was shove the insulation to the side and toss some boxes up there. And just like that, all of our Christmas stuff is safely tucked away (eagerly) awaiting the day it can be pulled out again.

I can’t believe we took that long to actually look up there, and I’m SO excited that we don’t have to incorporate a storage solution (like a closet) into our garage plans. We’re one step closer to getting started on this room!

Have you ever discovered an area of your home that you didn’t think was usable? Or is that just us?

Related posts:

Pin It!

3 Comments »

17 Apr

Where Are They Now?

Posted by Amanda under Creating With the Stars 2013, Garage, Guest Room, Home, Living room, Reading Room

We showed you a lot of really fun projects over the last several weeks as we were a part of Creating With the Stars. I had an absolute blast coming up with everything and Corey and I adore all of the projects we did.

BUT.

When we showed you photos of them, they were the photos we used for the competition. Which means they were staged like crazy and had to be anonymous, so you basically just saw the project and nothing else.

And that’s no fun, is it?

So today, we’re taking a quick little tour of the four projects we did for Creating With the Stars and checking out what they look like in a real-life setting. Because I like to keep it real around here and some of the projects look pretty different in use in our home than they did in the competition (let’s face it – if I kept all of those cute accessories in the bookcases, I’d have NO accessories anywhere else in my house!).

Let’s kick it off with our week one project. Here’s what it looked like in the competition…

…and here’s what it looks like now.

It’s pretty much the same, with just a few changes in the styling. We hung a pink mirror over it for the competition, but in reality the pink looked absolutely crazy up against our curtains, so we switched it up for something a little more suited to the room. I’d like to add some more cute accessories to this guy (so it’s not quite so bare), but I absolutely love how it works in the living room.

Corey and I had been going back and forth on what to put in that spot for a while – it was pretty awkwardly empty beforehand, but we weren’t quite sure what would work best there. Now that we have this here, I can’t imagine anything else. It’s right in-between the dining and living rooms, which makes it perfectly suited to making both drinks to go with dinner and drinks to go with, you know, sitting on the couch and watching television. Love it.

Week two was shot in our bedroom (as I’m sure many of you guessed), but we actually had a different plan in mind for it while we were making it. Here it is in the competition…

…and here’s what it looks like now.

It fits perfectly into our guest room and I love how it goes with everything else (though, it’s pretty clear I need to learn how to take better photos of this pink room!). Once again, the styling is very lacking, but we’ll get there. I have quite a bit of work to do in this room – as you can see, I switched around the furniture arrangement from the last time you saw it, but I haven’t changed the art yet, so it all looks a bit funny. 

I have plans for it, though, so be on the lookout for an update to this room soon!

Our third project was shot in our garage. Remember this one?

I’ve mentioned before that Corey and I have plans to turn our garage into an extra living space, and this is a bit of a preview of what it’ll look like. Of course, we haven’t actually begun the process yet (hopefully within the next couple of months!) so it’s looking kind of…crazy right now.

Yeeeah definitely a disappointment compared to the original, right? This room is in a transition phase as we start prepping it for the big renovation, so it isn’t cute right now. But, I have high hopes that as we get started on actually converting the room, we’ll be able to live up to the awesomeness of our competition project.

And finally, week four. The big one.

This room looks mostly the same as it did during the competition…

…except the bookcases have been re-arranged and our elliptical and dog kennels have been added back in. It’s a bit, um, crowded.

Once we get the garage done, the dog kennels and elliptical will be moving down there, so hopefully in a very short time this room will be looking quite a bit better. The rug we used in the competition photograph was actually my sister’s (as were many of the accessories from the other weeks), so once it was all over we brought up the rug from week three and put it in here.

I love how it looks, and I’m pretty obsessed with this room. It’s the perfect place to relax and read, and we’ve gotten quite a bit of use out of it already. 

As you can see here, we haven’t quite finished all of the trim yet – we didn’t need to complete the whole room for the competition, so we figured we’d save ourselves a bit of stress and do the rest later. We plan to trim out the entire window at some point soon, and then obviously finish all of the picture molding around the bottom. It’ll probably happen once the garage is all finished and we have a little room to actually work in here again.

And with that, you’ve officially seen all of our projects in their natural habitats. Not quite as stylish and photo-worthy as they were for the competition, but that’s real life, isn’t it? We’re head over heels in love with all of the projects we did, and I think it was a really awesome way for us to push ourselves and see exactly how creative we could get. I’ll admit, there were a few times where we thought we weren’t going to manage to come up with a good idea, but we always managed to pull through and come up with something we were proud of – I love that we got the chance to see how much we could really do!

Does anything in your house look different in real-life than you make it look for photos? Anyone else have some crazy looking in-transition rooms in their house right now?

Related posts:

Pin It!

6 Comments »

Love & Renovations All rights reserved © 2011-2013

I am a HowJoyful Design by Joy Kelley