
How to Stencil a Wall (It’s Easier Than it Looks!)
Last updated on July 25th, 2024 at 01:11 pm
Ever wonder how to stencil a wall with an allover stencil? This project is so simple, but it’s absolutely gorgeous! Here’s a step-by-step tutorial.
One of the hardest things to decorate in any home, in my humble opinion, is the area around the television.
No one really wants that giant eyesore staring at you when you aren’t actively using it. But, it’s so hard to figure out exactly how to disguise it without making things too difficult on yourself. We had been living with this problem for a while. We weren’t quite sure what to do about it, but very annoyed that the wall where our television sat was very boring and ugly.
So, when I got the chance to review a stencil from Cutting Edge Stencils, you know I was all over it. I might have even done a happy dance in the living room. Not even kidding. I hadn’t really thought about using a stencil on that wall before, but it seemed like the perfect solution. It’s cheap, easy, and it makes a big impact!
Corey and I spent forever browsing all of the options on Cutting Edge’s website and we finally narrowed it down to the Zamira Allover Stencil. It’s bold and graphic, and we thought it would look amazing in the living room. And we were right.

Also, I’m not exaggerating (at all) when I say that every single person who enters our home comments on this wall and asks how we did it. Most people think it’s wallpaper! The look on their faces when I tell them I painted it myself is always pretty priceless.
I mean, I’d do it again just for the fun of that alone.
I’m sure you want to impress all of your friends too, right? Let’s chat about how to stencil an accent wall!
How to Stencil a Wall
Supplies I Used:
- Zamira Allover Stencil
- Small foam roller
- Level (I used the one that came with the stencil)
- Paint
- Painter’s tape
- Paint tray
- Paper towels
- Small paint brush
Planning and Prep
Let’s get on with the process. I would be lying if I said I wasn’t a little intimidated terrified when I received my package from Cutting Edge in the mail. It included the stencil, a level to make sure things are nice and straight, and a foam roller. I read the directions about four times, growing more nervous each time I read it. Then I promptly shoved everything into the garage and pretended like it didn’t exist for a few days.
That’s what I do when projects scare me – I ignore them.
Unfortunately, now every time I looked at the wall in our living room, I was reminded that it was supposed to be covered in a pretty stencil that had already defeated me just by existing. I couldn’t let myself be scared anymore. So, last week Corey and I marched ourselves into Lowe’s, picked up some paint and Frog tape, and declared that it was time to get the dang stencil on the wall.
When we got it all home, I didn’t even let myself pause to catch a breath before I dove right in and started working. I knew if I stopped for a second the pressure would cripple me and I’d be forced to ignore the project again. So, I watched some of the tutorials on Cutting Edge’s website and went for it.
Here’s the process I followed:
Step 1: Paint Base Wall Color
We had already done this step, but if you haven’t (or if you want to change the base wall color), start there. There are lots of different combinations you can do here, so take the time to think about it. You don’t have to just leave the wall color as-is!
Here are a few ideas for color combinations:
- Paint a fun base color on the wall and use white for the stencil
- Use white for the base color and go crazy with the stencil color
- Try a tone-on-tone look: use the same color for both the wall and the stencil, but in different sheens of paint (or, just slightly different shades)
- Or, you can do what we did – choose a neutral for the wall color and go with white for the stencil
The sky’s the limit when it comes to the combinations you can choose for your stencil – my biggest recommendation is to go with something classic that you know you’ll love for many years. If you choose a bold wall color and add a color to the stencil on top of it you’re more likely to lose interest in it faster.
And that was a lot of rambling about painting a dang wall. Step one? Check.
Step 2: Tape Off the Ceiling Line
Go ahead and tape off the walls you aren’t stenciling as well. Stenciling requires a lot of focus and sometimes some awkward positioning – you don’t want to also have to worry about avoiding getting paint on walls where it doesn’t belong.
Step 3: Choose Your Starting Point
I chose to start my stencil in the top corner of my wall. My pattern is very graphic and doesn’t necessarily have a “center point”, so it doesn’t really matter if it is centered on the wall. If you have something that might look strange off-centered, I’d recommend drawing a line down the center of your wall and starting right in the middle.
Either way, you’ll use the provided level to make sure the stencil is nice and straight, then tape it into place.
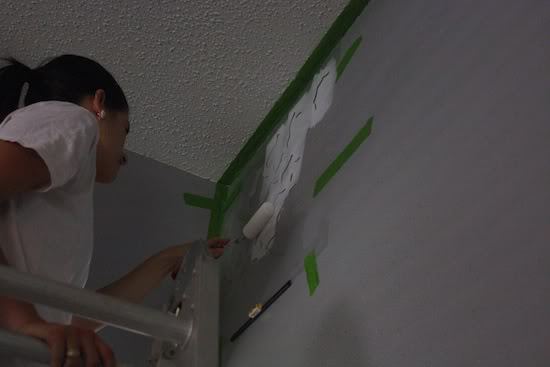
Step 4: Apply a light layer of paint
When they say to blot off the excess paint before you put it on the wall, they aren’t kidding around. It’s vital that you don’t have a ton of paint on your roller, even if you feel like it’s too light. If you’ve got too much the stencil won’t go on well, and you’ll get some splotchiness – and no one wants bleeding stencil lines!
The process I used was to roll my roller in the paint, then pull it out and gently roll it across a paper towel to remove any excess. Then I applied it to the wall without using too much pressure (again, you want to avoid anything that could lead to paint bleeding through). If you need to do a few thin coats, that’s perfectly fine – as with almost any painting project, it’s better to do several thin coats than one thick and sloppy one.
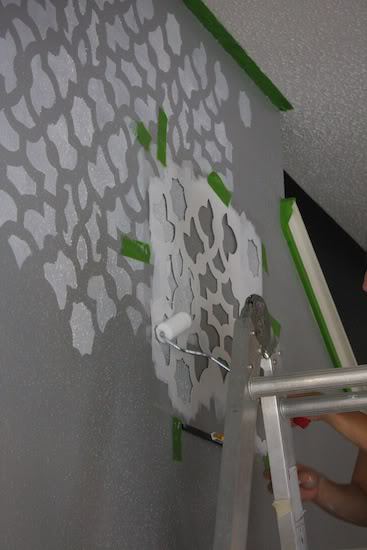
Step 5: Re-position the stencil
The stencil will have little holes called registration marks that help you line it up appropriately. The process I typically followed was to remove the stencil from the wall, wipe off any excess paint from the back, and then use the registration marks to line it up with the previous stencil. Then, just tape it into place and repeat the process.
If you’re nervous about smudging paint, you can wait a couple of minutes before putting the stencil back on the wall, but I didn’t have any issues without waiting.
Step 6: Fill in the corners and ceiling
The hardest part of the process is getting the small areas in the corners of the wall and up by the ceiling. One option is to cut the stencil down to make it easier to work with, but that felt like a really permanent solution to me (what if I cut it wrong?!), so I just crammed the stencil into the corners the best I could. A busy pattern like this is extremely forgiving, so if things don’t line up 100% perfectly or if there are small smudges in the corners, you won’t really notice. I simply lined it up as best I could, folded the stencil and pushed it into place, and then used the small brushes to apply a thin layer of paint.
This part might be stressful, but it’ll be fine – I promise.
And that brings me to my most important tip:
If you mess up, don’t worry about it. This was a hard thing for me to get through my head. But, I was shocked by how the little mistakes that I made throughout the process were completely invisible once the wall was all done. Don’t sweat the small stuff in a project like this.
And that, my friends, is just about it. I was absolutely blown away by how easy this ended up being. I did the whole wall by myself in about 3 hours!
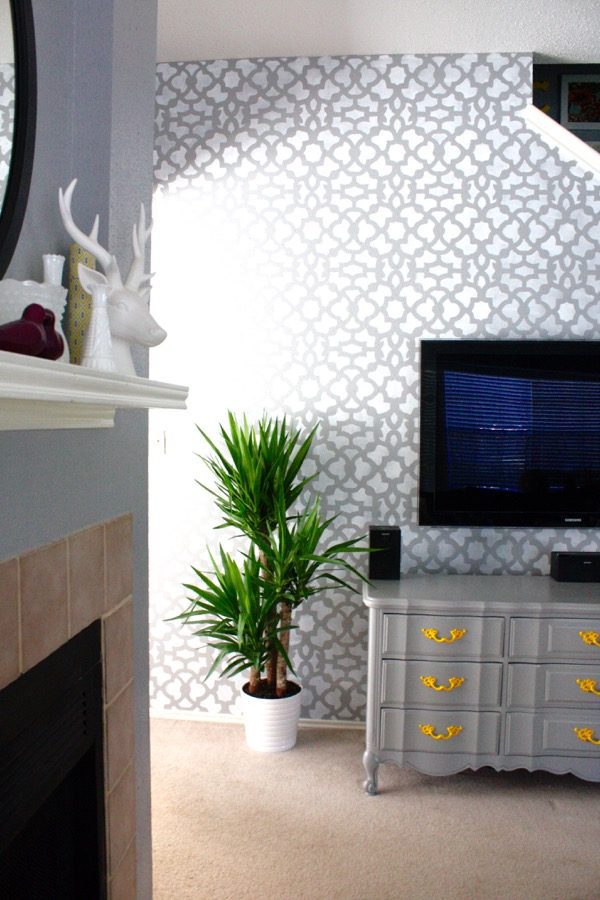
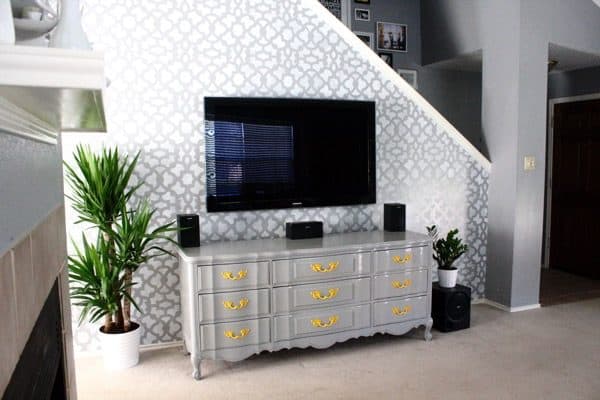
There are no words for how in love I am with this entire project. The wall turned out better than we ever could have imagined. We are so happy with the impact it makes in the room! It was SO EASY! I am now officially looking for an excuse to use this stencil on every inch of my house.
Too much?
Ah! That looks soooo cool! I love the stenciling…and accent walls are so fun! I have a feeling I’ll want to make one when we finally move into a real house where I can paint!
This is great! Makes me feel like I picked the wrong stencil. (Casablanca). I’ve tried a handful of time to do the stencil but it just bleeds. I am doing white over a medium tan. I think I was trying to do too many coats to get a opac white. Don’t think I’m supposed to. I like how you said it gives it a worn I look, so maybe I’ll embrace that! Either way, I’m really discouraged because I thought stenciling my kitchen wall would be a tad bit easier and less stressful than its been. I’m at the point now where I need to repaint a huge patch of my base color and start over. Glad I found your blog via cutting edges fb!
I love that stencil too! Definitely give it another shot! Just make sure not to worry about getting enough paint on the roller – I kept mine very lightly filled and just pressed firmly on the wall. The videos on Cutting Edge’s website helped me tremendously, too!
Gorgeous!!!! I seriously not an hour ago bought that dressers twin. I love the walls o much, we just painted our master bedroom slate grey. I’m wondering and searching your site…. did you happen to refinish the dresser yourself or did you do a blog post featuring it at all. I’m IN LOVE with it. So excited to have come across your blog today thanks to Cutting Edge Stencil on Facebook. 🙂
Thanks – and thanks for stopping by! 🙂 I did do a post on converting the dresser from a dresser to an entertainment console (it houses all of our television components) and you can see that here: https://www.loveandrenovations.com/2011/06/more-form-same-function/ – I didn’t post at all about actually refinishing it, but we just painted it gray and added a few coats of polyurethane!
so beautiful, I don’t think we could make that in FRANCE! so lovely idea!
Oh, wow, that’s gorgeous. And I love that dresser!
Love it!! It turned out so great!!
Love the impact on the room! It looks amazing!
OMG! LOOOOVE!
Amanda, that looks awesome! I love the stencil you chose and it looks so great behind the tv. Awesome job! Love the pattern in the room!
What a stunning transformation!!! LOVE IT.
It looks so great! It really brightens the space and adds so much interest.
i love that, that looks soo great! i am so scared to try stenciling, but this is great inspiration. love your yucca and pot-ikea, right? i have the exact same thing. i think i need one for the dining room, too!
Yes – Ikea! I absolutely love it and I kind of want one for every room in my house…and my classroom! 🙂
What a difference the stencil makes! I’ve been toying with the idea of a full stenciled wall in the bedroom. Hiding your wires, did you end up cutting 2 holes in the wall? I think that is in our near future as well.
Yes! Corey bought two outlet-type things that you put into the wall that help guide the cords down (or up) the wall – it was in the electrical section next to all of the other outlets, and it was super cheap. It definitely made the job easier.
I LOVE this! I can’t believe it took just 3 hours. Did you wait for each section to dry before you moved on or did you just place the stencil carefully over the wet portion when you needed to line it up?
I actually didn’t wait at all – just pulled the stencil off and put it right back on. The only time I ever had a problem with smudging was when my hand hit the wet paint, but even then I was able to wipe it off with a wet cloth very easily!
I love how much this brightens up the room! Great job. I always think I want to stencil something and always end up talking myself out of it.
Love it!! I was skeptical at the beginning but the after looks soo good!!
I am absolutely in love with the end result! It makes such a huge difference! Such an awesome project guys!
You and I are on the same page with so many projects and this one is no different. I have been looking and drooling over their stencils for a week now (spending way too much time doing so I might add). I plan to do my 1/2 bath in a botanical like http://www.cuttingedgestencils.com/hummingbird-stencil.html.
Love that!
THIS IS AWESOME.
Wow. It looks amazing! Perfect wall to stencil.
This is seriously amazing! I love it. You make me feel like I have the capability to do it!
You totally do! It’s easy! 🙂
HUGE impact. Want!!
Okay, that’s just plain amazing, right there! Such a huge difference!
Stenciling has come a long way from the country borders of the 80s and 90s! (and how smart is it to have a built-in level on the stencil, that’s genius!)
WOW, it looks like a completely different house now! Fabulous job!
OH. MY. GOODNESSSSS……. AMAZING!
Seriously, I am AMAZED. I want to do this all over my dining room! To bad we rent 🙁
Wow! It really makes a big difference in that area, love it!
LOVE IT. It looks so great!!! I’ve been talking about stenciling this little nook-ish area in our guest room for almost a year now and have been too intimidated/lazy to take it on….. perhaps I should get one that!
WOW! What a huge difference. It really makes your entertainment dresser pop, where before it just blended in. Great job, and hooray for only 3 hours!